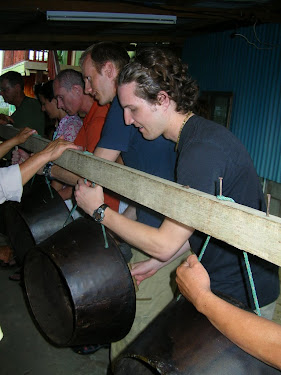
In 2007 my wife and I spent some time touring the jungle in Borneo. Whilst we were there I got the unique opportunity to play some of the authentic village instruments, in particular anything percussive.
I searched high and low while we were there for some small instrument I could bring home as a special treasure and ended up bringing home 9 plate sized gongs... and they do get played now and again, especially by some young boys of mine.
What I learned from the trip though, is that the "authentic" instruments from villages in Borneo are not the ornate and beautiful carved gems that many of us might see in an import store down Specialty Lane in Super-Hipsterville, CA but are put together from the most basic materials that scavenged from the nearest renovation project.
For instance-- The instrument I am playing in this photograph is largely old wood floor boards which have been sized so that they make different sounds. These are tacked onto old plywood with what looked to be shoe tacks, and the blocks themselves rest on rubber cut from the soles of old flip-flop sandals. A couple Balsa-wood sticks from the forest and some paint and you've got yourself a pretty ingenious indigenous instrument.
Since that trip I have been longing to create my own unique instruments, and I have finally found the resources I needed to do so.
It started with some empty Pringles cans which I collected post 4 year old birthday party. Add in some scrap planking and screws that were left over from the bed I made (in the last post) and some rubber bands stolen from the junk-mail rolls that perpetually appear on our front doorstep and I had myself a design for what I have called The Canorpheum.
I'm in between on providing the schematic on how to make one yourself... seems excess... but I have it for anyone that wants to comment. I was lucky that the boards were already cut almost perfectly for the box itself. I had but to chop a couple boards here and there, and use a drill and jigsaw to make the template for the cans to sit in.
Now all it needs is some paint. I'm using the iPod to create some unique stencils of the boys (Fotofiti for anyone who cares). Take a listen:
So last week I was involved in a production of one of the world's only Parkour-Plays as part of a #GIGYYC grant that was won by a friend of mine late last year.
He phoned at the end of January to say that he could have ~$1200 if he could put up a play inspired by Parkour by March 30th. He just needed a script... And as proud as I am of this project we are all overwhelmingly proud of (every ticket was sold) my wife knew that it was keeping me from my real passion -- dumpster-dive furniture fashioning.
That's right. Be it known that I have always had a real knack for handy work, in particular carpentry. And there is no subfield in carpentry more respected and awe inspiring than that of quality home furnishings. Yes, I know it seems like I have never actually built anything, but when you've spent as long as I have thinking about building stuff, I'm practically an expert.
In all seriousness-- I get this phone call midway through March:
Tom, I have an odd favour to ask, you see there's this old palette I saw in the alley behind the church, if you get a chance while you're out with the boys to swing by and pick it up--
Sorry what?! An old palette, look I saw on the internet [during a late night in front of the t.v. of course] that you can make a headboard for a bed from an old palette and I was hoping you'd pick one up for me. I know it's weird but ---
Yes, it's weird.
but, really, don't feel obligated to pick it up...
and when your wife says that -- well let's just say I wasn't married yesterday.
"Seriously Dad, you built this?!" Not likely...
She didn't however mention that this palette was 7 feet tall at the time she suggested I pick it up. I did manage to shove it into the back of the van on a wild tangent to my normal daily errands and didn't give it much more thought until (while sitting in the Mr. Lube line-up) a kind sales clerk mentioned "Ha! Sorry, I didn't realize you had two kids [in the back of the van] can't hardly see the second one for the giant palette in the way."
So then I get this email a couple days later with about 19 sites related to at-home-scrap-recycling-keep-your-husband-busy-projects with no other explanation than --- this was what I was thinking about.
Now and again I wish that my life was more like the movies and she would send me a message saying "this is what I was thinking about." and it might come with some sort of pseudo-sexy attachment suggesting perhaps a little romantic rendezvous was heading my way... but no. Just links to DIY sites... as though she's saying -- hey, do it yourself. Yes, that's what she said.
But I'm inspired. I'm feeling handy. I can do this. And you know what... I think largely because of the success of Mindfire (the play) I felt a little... well... indestructable? As though I could do anything... so -- and here's my proudest accomplishment, I turned off the internet, turned on my time lapse and you can watch the results of my efforts w/o commentary and reserve judgement for yourself. (p.s. when the composer for the music reads this and watches the movie then I expect that artist to contact me with the correct permissions and attribution rights just like when that artist contacted me before he cut my head from my blog-photos and pasted it onto unicorns frolicking near rainbows...)
In the end the project cost maybe $100 and it took three solid days working with and around my two sons. But it was fun, and it felt good to finish it, and for the first time I was really proud of my handywork. Like I might actually be able to build nice things too.
Things of note:
Supplies (for those interested in facsimiles)
Wood = knotty pine, cheap cheap at the local hardware mart (6" sideboards, 8" top-board and 10" runner)
Stain = Minwax Wood Stain: Classic Gray 271
8 x 2" bolts, washers, and wing-nuts
2" #8 wood screws
1 1/4" #8 wood screws
6 x corner brackets
Wood glue
1 old weathered palette from some back-alley Grand total ~ $70
The extra cost came from the steel finishing plate added at the end, totally frivolous and extravagant but super-keen!
Final Version (three days in)
Steel plate not shown in this picture
-- but you can see it on Instagr.am!
I can't wait to show off my next project... It involves music and Pringles (tm).